Why You Should Buy DIY Window Screen
Cost Effective DIY Solution For Insect-Free Home
A (do-it-yourself) DIY window screen is a great choice since it is cheaper to make and easier to assemble. It also employs materials that are abundantly available. Insect screens are a must for all homes and building structures that are erected in places that are predisposed to mosquitoes. They are fixed on the windows to forestall the possible entry of mosquitoes and other undesirable pests that affect the circulation of fresh air into and out of the rooms.
These kind of window screens are manufactured using fibreglass or metallic wires. Synthetic fibres are subsequently used to fasten the screens using wood or metal.
Step-by-Step Procedures

Obtain the Necessary Measurements
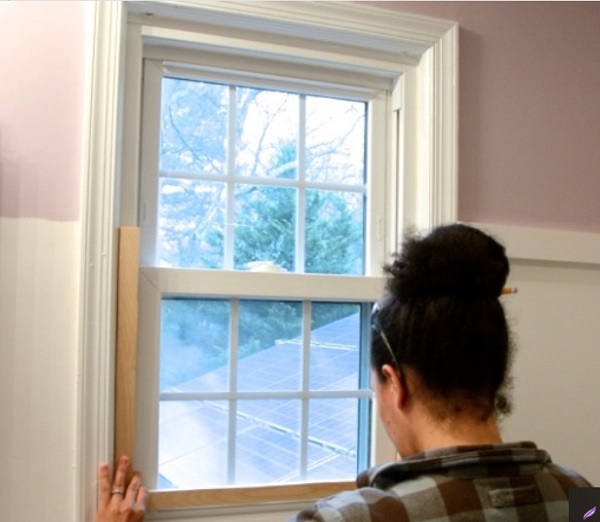
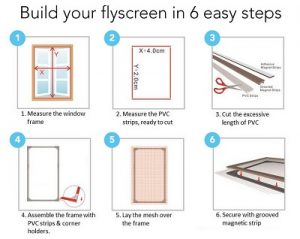
Start off by obtaining the necessary measurements. Measure the dimensions: the lengths and the widths where you will place the window screen. Take the measurements of the interior edges and openings as well.
After this, determine how you shall mount your window screen. The manner you choose to do so shall affect to a great extent the widths and the heights of your screen. In case you opt to mount the screen on your windowsill, you should increase the width by an inch to that of the opening. You should also increase its height by half an inch.
If you plan to mount the screen on the front window, increase the measurements of the openings by half an inch to make room for overlapping. If you, however, intend to place the window screen inside the window, reduce the measurements by one centimeter.
Prepare the Various Pieces Appropriately
You will require some corner stakes and screen frames to hold the wire mesh in place in order for you to obtain the right measurements. See to it that the compatibilities of the frames and the opening are very close. By taking the measurements of the corner stakes some distance from the frame will ensure that they are very compatible.
After you have come up with the appropriate measurements cut the various constituent components as per the measurements you have taken. Start out with the exterior portions when measuring these pieces. See to it that their ends tilt at an angle of around 45 degrees. Lastly, even out the rough edges by using a sandpaper or a file.
Bring Together the Frames
Place the constituent parts and components on a flat surface. Proceed thereafter to bring together these components in order to form the rectangular shape that is required. Attach the corner skates to the corners of the frame. This is to keep the corners in the right shape and form that is required. Tighten the joints by use of a hammer.
Insert the Wire Mesh in Place
To complete the construction of the screen, insert the wire mesh. To do this, lay the wire mesh screen above the frame. Cut the wire mesh and thereafter insert the edges of the frame in the grooves.
Be sure that all the sides measure are at least 2 cm wider than the sides of the screen frames.
Be sure also that the corners also fit perfectly to minimise the likelihood of sliding of falling off.
Lock the screen on one of the sides of the frames securely using magnetic strips. Pull it and tighten it on the other side. Fasten and lock the corners tightly as well. Finish off by trimming any excess screen to give off a clean appearance.
There are a couple of ready-made window screens on the market at the moment. As you may well have a noted, a do-it-yourself window screen is easy to make. The procedures involved are also very transparent and simple to follow. Make good use of the notes we have provided and get working already.
Easy DIY Custom Fit Insect Screens
Just measure your windows and choose from one of our x3 screen sized options which you can easily cut down to fit.
If you want an elegant, stylish, and classy magnetic screen for hard to screen windows (usually hopper or casement style) – you will find what you need at Magnetic Insect Screens.
Pay a visit to Magnetic Insect Screens website and gain access to a vast array of products. You will also find the best ever do-it-yourself insect screens for your home. We are very glad and on standby to assist you with your inquiries concerning our products. You will never at all regret using any of our magnetic window screens.


6 reasons why you should choose a magnetic flyscreen as your push out window flyscreen
- Magnetic fly screens are streamlined, tidy and will not hinder views or take up valuable space in your Kent home
- Opening & closing the insect screen to access your window is very easy with a flexible PVC frame
- Magneticfly screens can be utilised on nearly every window type including: timber, steel and UPVC
- A high quality fly screen made from sturdy and long-lasting products & materials
- We are a family-owned business who strive to provide extraordinary service
- All magneticfly screens include a lifetime parts replacement guarantee
I love the screens! Easy to put together and easy to use… Great value for money…would highly recommend these screens.
Very satisfied with my new insect screens and the speed of delivery after ordering. Excellent product and service – highly recommend to others.

Have A Question Before Wanting To Make An Online Order?

